

In this article, we will discuss how to create a player token. This will break down what each of the token types is, and then we will discuss how to create the player token, to allow your players to have a token to control. This guide will focus a little bit on the DND5e ruleset we set up here, but a lot of this may apply to most rulesets. I will discuss the effects tab in a later tutorial.

Create New Actor
If you click on the Actor’s Directory (you can find out more here about directories) and click “Create Actor” you will be given a new prompt to create a new actor token. Below I will explain what each token is:
Player Character: This is the character that your players would use. This is for characters that are generally just used by players, rather than by the DM/GM.
Non-Player Character: This is for characters and monsters usually played by the DM/GM. Everything from a generic zombie to your BBEG (big bad evil guy) is usually made as an NPC.
Vehicle: This is for things like boats, ships, airships and even things like a horse and cart. This sheet has a lot of information about speed, vehicle type and even information about what is being stored in the vehicle.
We will break down each of these in their guide to explain them. Below will be the information for creating your Player Character.
Your first step in playing an adventurer in any TTRGP (tabletop role-playing game) is to imagine and create a character of your own. Your character is a combination of game statistics, roleplaying hooks, and your imagination. You choose a race (such as human or halfling) and a class (such as fighter or wizard). You also invent the personality, appearance, and backstory of your character. Once completed, your character serves as your representative in the game, your avatar in the game world. To put all of that information together, you use your character sheet. This is a huge part of setting up your player character.

Ability Scores and Skills
Much of what your character does in the game depends on their six abilities: Strength, Dexterity, Constitution, Intelligence, Wisdom, and Charisma. Each ability has a score, which is a number you record on your character sheet.
The Ability Score Summary table provides a quick reference for what qualities are measured by each ability, what races increases which abilities, and what classes consider each ability particularly important.
After you have rolled your stats you take your six numbers and write each number beside one of your character’s six abilities to assign scores to Strength, Dexterity, Constitution, Intelligence, Wisdom, and Charisma. Afterwards, make any changes to your ability scores as a result of your race choice.
After assigning your ability scores, your ability modifiers (for an ability check or a saving throw) will automatically be determined for you by FoundryVTT.
Besides the attribute scores, you will see a list of skills (Acrobatics, Animal Handling, so on) which will also be automatically updated based on your attributes.
You will see a small circle below your attributes, or to the left of your skills, which you can click to add proficiency and expertise. You can also add half proficiency for optional rulesets.
If you hover over an attribute you will get a hidden menu (the symbol of the gear cog beside Strength in the picture) and I will explain that below.

Configure Saving Throws
If you hover over an attribute you will get a hidden menu (the symbol of the gear cog beside Strength in the previous attribute picture) which will allow you to make some global changes to your sheet.
Proficiency Level: This is a place you can also change the level to either be proficient, not proficient or even to have expertise.
Saving Throw Bonus: This allows you to make a change to that specific saving throw. For example in this case I picked Strength. If I added a +2 it would add a +2 to specifically saving throws for Strength by this character.
Global Saving Throw Bonus: This allows you to add to ALL saving throws by this character, not just Strength but also the other 5 stats listed in the section above.
Ability Checks: This is the same rules as the saving throws above, but specifically regarding ability checks instead of saving throws.

Player Resources
From this section, you can control the various game resources for a character.
Resource: Primary, Secondary and Tertiary Resources are used to track a variety of different features for your player character. For example, if my Paladin had Smite, I could simply add the number of “Smite” available and then mark a number down as I go. I could also set the ability to track it automatically, but I’ll explain this when explaining Features. You can also tick SR and/or LR to track if it recharges automatically on a short rest (SR) or a long rest (LR.)
Death Saves: This is where you track successful and failed death saving throws. In D&D when your player character goes unconscious, they usually make saving throws to stabilise or slip into death. As you track those rolls you can monitor them here on the top of the sheet.
Exhaustion: When characters encounter a situation that may cause exhaustion (long travel, certain spells, so on) they can monitor their exhaustion status here.
Inspiration: Be it Bardic, or granted by a GM, each player can track if they do or do not have inspiration here on their sheet.

Player Statistics
From this section, you can control the various parts of the character’s information. Let’s break it down.
Size: You can pick the size of your character. Everything from Tiny-Gargantuan, if playing DND5e
Senses: You can add any sense related to your character, here. Blindsight, Darkvision, Tremorsense, Truesight, you can change the distance measurement and add custom ones like “Passive Perception.”
Languages: There are a bunch of pre-set languages based on your ruleset, but you can also add custom ones at the bottom.
Damage Immunities/Resistances/Vulnerabilities: You get a comprehensive list based on your ruleset, but the useful thing about this is not just simply seeing it on the sheet, but FoundryVTT usually includes this information when rolling for damage.
Condition immunities: This has a comprehensive list, like the steps above, but this time just about conditions you’re immune to. Example: Exhaustion, Stunned, so on.
Weapon Proficiencies: This opens a list for your to tick and all weapon proficiencies on your sheet for tracking. You can go by entire categories or just specific weapons.
Armour Proficiencies: This opens a list for your to tick and all armour proficiencies on your sheet for tracking. You can go by entire categories or just specific armour types.
Tool Proficiencies: This opens a list for your to tick and all tool proficiencies on your sheet for tracking. You can go by entire categories or just specific tools.
Special Traits: This is for feats (example, Reliable Talent) so it just automatically includes that in all rolls.

Character Management
This top section is where you track all the features of your character.
Picture: Click this and navigate to your various assets to update the picture. This will automatically update the token, too. We can adjust that later.
Race: The player character race.
Background: The chosen background for the character.
Alignment: Their chosen alignment
XP: You can update their XP here, simply type “+” and add your XP gains and it will auto-update.
Hit Points: Their health. This is one of the places a player can see their remaining health points.
Hit Dice: This is used while you rest, and is automatically determined when you select your class.
Armour Class: This is automatically determined when you equip your armour in your inventory.
Movement: How far you can move during your turn.
Initiative: This bonus is usually automatically calculated based on your stats.
Proficiency: This is usually automatically updated based on your chosen traits.

Inventory
This is where your player maintains and keeps track of all the various things they acquired for their character. In the example image, I placed a greatsword in the inventory. You can always click “Add” to create any item type you wish, but in this case, we are using a weapon. If you click the shield symbol you can “equip” the weapon, so the stats are appropriately rolled. This also applies to the armour that you equip.
For a detailed breakdown of each item type you can always check here, but effectively you are looking at a standard inventory type from any normal character sheet. It may be similar in other game types, too.

Features
This is where your players will put things like their class, their active/passive abilities and any feats or race/class features they may have accrued throughout their game.
The example on the right is for a Druid. Your game rules may give you a compendium (check compendiums tab) that has some pre-built classes, which you just drag onto your player’s sheet. If you do each level (start on 1, then 2, then 3) it will also populate the sheet automatically for you with their level up features, spells, skills and so on.
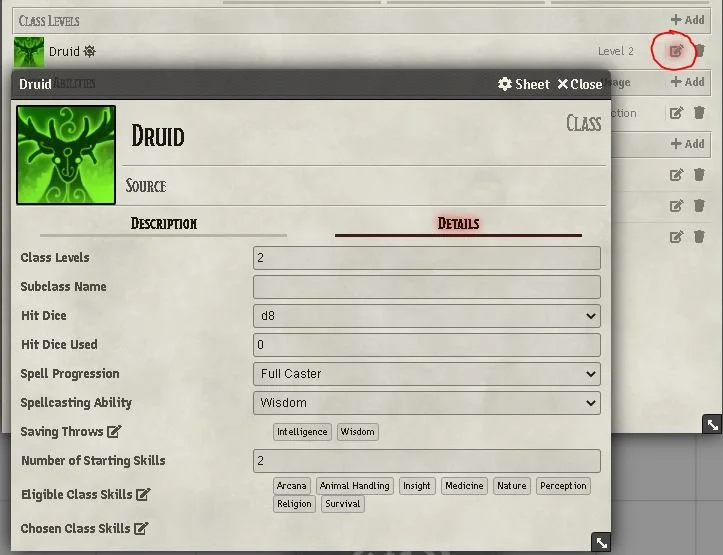
Update Class Information
If you click on the little square with a pencil in it, next to your class, you will open up an editor where you can see all the changes you can make.
Class Levels: This is how many levels in the respective class you have chosen. For example, level 2 Druid, but if you dragged Warlock onto the sheet it would be a multiclass and you track how many levels in each class.
Subclass Name: The name of the chosen subclass, fairly straightforward.
Hit Dice: Which dice you use for your hit dice rolls, for example, Druids are 1d8 per level.
Hit Dice Used: How many hit dice are “consumed” already on their sheet. You can update this on the sheet itself, as shown above.
Spell Progression: Full Caster, Half Caster, Artificer. What type of spellcaster they are.
Spellcasting Ability: Which modifier they use for spells. The PHB (in DND5e) will usually tell you this.
Saving Throws: Which saving throws the class is proficient in.
Number of Starting Skills: How many skills they can pick at the start
Eligible Class Skills: The list they can choose the previously mentioned starting skills from
Chosen Class Skills: This is which skills they have chosen

Spells
There is a full guide on combat and spellcasting coming soon, but for now, we can do a brief breakdown.
When you pick your class (as shown above) it will automatically determine your spell slots. You simply drag your desired spells over to the sheet from the compendium. You usually have a basic compendium with your game rules, but you can create them on the sheet by clicking “add” on the bar with each spell level.
You can also click the symbol of the sun (highlighted in the image) to “prepare” the spell.

Biography
This tab is all about the bio of your character.
When selecting a background it asks you to roll some traits, as listed on the left of the image included here. You fill these out accordingly.
You can also click the pencil in the top right, which may not be invisible until you move your mouse there. This will allow you to edit your biography and update your story and information on the right side of the sheet.
That is everything for setting up your player character. In the next guide, we’ll go over setting up a non-player character. It is mostly the same, but with a few distinct differences for the convenience of the GM.